Scary Maze Game
A scary maze game is basically a maze where an image and sound effect is played at the end of the game. This scares the players as they are expecting another level in the game, but instead receive a scare. An example of a scary maze game can be found at: www.maniacworld.com/maze_game.htm
The tutorial is split into three sections. The first section creates the instructions; the second section creates the maze and the final section adds the scary image and the sound effects to the game.
I have used a free stock image of a scary face which is available from: everystockphoto.com and have also used a screaming sound effect which is available from: sounddogs.com. Some knowledge of basic buttons and custom cursors are need for this tutorial.
Step 1 – Instructions
Open a new Flash document with 400 width and 300 height. Change the background colour to #00CCFF.
On the timeline right click on the first frame and select Actions and add the following code:
Stop();
Mouse.show();
**Only add the Mouse.show() if you intend to use a custom cursor for your game.
Step 2
Select the text tool (T) and type your instructional message on the stage. I have typed the following message below using Myriad Pro Cond font type, but you can type whatever message or font type you wish.
Step 3
Create a button on the stage with the message “play” like below:

For more information on buttons checkout the basic buttons tutorial. Now right click on your button and select Actions and add the following code:
on(release){
gotoAndStop(“Scene 2”, 1)
}
**This code will stops at frame 1 on the second scene when the button is released.
Step 4
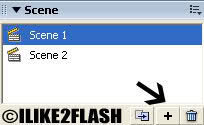
Insert a new scene by selecting Window > Other Panels > Scene or (Shift + F2).
Click the black plus sign to add a new scene and make sure the new scene is below current scene
on(release){
gotoAndStop(“Scene 2”, 1)
}
**This code will stops at frame 1 on the second scene when the button is released.
Step 4
Insert a new scene by selecting Window > Other Panels > Scene or (Shift + F2).
Click the black plus sign to add a new scene and make sure the new scene is below current scene
On the timeline right click on the 1st frame, select Actions and add the following code:
Stop();
Step 5 – Create the maze
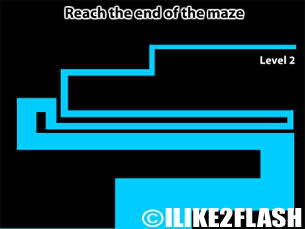
Take the rectangle tool (R) and create a maze pattern on the stage like below.
Firstly, you need to create a large rectangle that fills the whole area of the stage. Then you create smaller rectangles on top of large rectangle.
You then delete the smaller rectangles to leave the areas visible underneath the large rectangle.
Stop();
Step 5 – Create the maze
Take the rectangle tool (R) and create a maze pattern on the stage like below.
Firstly, you need to create a large rectangle that fills the whole area of the stage. Then you create smaller rectangles on top of large rectangle.
You then delete the smaller rectangles to leave the areas visible underneath the large rectangle.
Here are a few points to note:
• Addition messages on the stage will help the player understand how to play.
• Make the maze pattern increasingly narrow towards the ends of the maze.
• Towards the end of the maze remember to leave enough room for your cursor.
• Try to keep the pattern simple, as making it too complicated will take you longer to complete.
• Keep the colour of maze consistent.
Step 6
Choose the selection tool (V) and select the whole maze. Convert your maze into a symbol by pressing F8. Give your symbol an appropriate name, check button and click ok.
Now right click on your newly created button and select Actions. Add the following code:
on(rollOut){
gotoAndStop(“Scene 1”,1)
}
** This code returns the player to the first scene when the mouse touches the maze areas.
Step 7
On the timeline insert a new layer. Select the brush tool with an appropriate brush size and make one brush point at the end of maze. This is area where the player has to reach on the maze. Your stage should look something like below:

Select the brush point and convert it into a symbol by pressing F8. Give your symbol an appropriate name, check button and click ok.
Now right click on your button and select Actions. Add the following code:
on(rollOver){
gotoAndPlay(“Scene 3”,1)
}
** This code sends the player the next scene when the mouse touches the red area.
Step 8 – optional
In this step you create a custom cursor object. For more information checkout the custom cursor tutorial. I have created basic rectangular custom cursor, but you can create whatever kind of cursor you wish.
Step 9 - Scary image & sound effects
Insert a new scene by selecting Window > Other Panels > Scene or (Shift + F2).
Click the black plus sign to add a new scene and make sure the new scene is below scene 2.
On the timeline right click on the 1st frame, select Actions and add the following code:
Stop();
Step 10
Import your scary image and sound effect into the library by selecting File > Import > Import to library select your files and click ok.
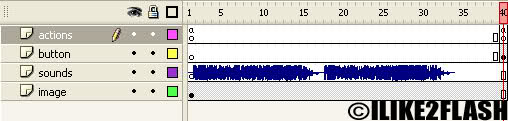
On the timeline rename “Layer 1” to “Image” and insert a frame (F5) at frame 40. Drag your scary image onto the stage and make sure it lines up correctly within the stage boundaries.
Now insert a new layer on the timeline called “sounds” and drag your sound file from the library onto the stage. Your timeline should look something like below:
Now right click on your button and select Actions. Add the following code:
on(rollOver){
gotoAndPlay(“Scene 3”,1)
}
** This code sends the player the next scene when the mouse touches the red area.
Step 8 – optional
In this step you create a custom cursor object. For more information checkout the custom cursor tutorial. I have created basic rectangular custom cursor, but you can create whatever kind of cursor you wish.
Step 9 - Scary image & sound effects
Insert a new scene by selecting Window > Other Panels > Scene or (Shift + F2).
Click the black plus sign to add a new scene and make sure the new scene is below scene 2.
On the timeline right click on the 1st frame, select Actions and add the following code:
Stop();
Step 10
Import your scary image and sound effect into the library by selecting File > Import > Import to library select your files and click ok.
On the timeline rename “Layer 1” to “Image” and insert a frame (F5) at frame 40. Drag your scary image onto the stage and make sure it lines up correctly within the stage boundaries.
Now insert a new layer on the timeline called “sounds” and drag your sound file from the library onto the stage. Your timeline should look something like below:

Step 11
On the timeline insert a new layer called “button” and drag it above the “sounds” layer. Insert a key frame (F6) at frame 40. Create a button on the stage with the message “play again?”
Right click on the button and select Actions and add the following code:
on(release){
gotoAndStop(“Scene 1”,1)
}
**This code returns the player to the instructions pages when the button is clicked.
Step 12
Insert a new layer called “actions” and drag it above the “buttons” layer. Insert a key frame (F6) at frame 40. Right click on the 40 frame, select Actions and add the following code:
Stop();
Mouse.show();
**Only add the Mouse.show() if you intend to use a custom cursor.
Your timeline should look like below:
Step 13
Test the game Ctrl + Enter.
You should now have a scary maze game
Test the game Ctrl + Enter.
You should now have a scary maze game